Web Fundamentals 4 Analytics and HTML Forms
Google Analytics
Google Analytics is an analytics service provided for free by Google. It allows you get an overview of how many people are visiting your site, where they come from, what they do on your site, and much more.
How it works
To use Google Analytics you need to place a snippet of javascript (that they provide) on each of the HTML pages on your site. When a user visits the page, the javascript sends a message to the Google Analytics site logging the visit.
- Set up a Google Analytics account. You want to choose the default 'Universal Analytics' option.
- In the Admin section, create a new account for your personal site.
- Following the instructions, install the analytics code on all the pages of your site.
- Push your changes up to the
gh-pagesbranch on GitHub.
Basic forms
A basic html form looks like this:
<form>
    <input type='text' name='name'>
    <input type='text' name='email'>

    <input type='submit'>
</form>
It has the following features:
- The whole form is contained with
<form>...</form>tags. - It has two text fields, using
<input>tags. - The input tags are stand-alone tags: they have no closing
</input>. - It has a submit button
<input type='submit'>.
Forms with labels
The above form contains only text boxes. A user visiting the form would have no idea what to put in each box. We can fix this with some simple labels:
<form>
    <label>Name</label>
    <input type='text' name='name'>

    <label>Email</label>
    <input type='text' name='email'>

    <input type='submit'>
</form>
- Clone the code for this session: https://github.com/code61/html_forms.git
- Open 'basic_form.html' in Sublime Text and Chrome.
Form submissions
- Open
basic_form.htmlin Chrome. - Fill in the name and email and click 'Submit'.
- What, if anything, happens?
The name property
When you clicked the submit button on the basic form, you probably noticed the url change to something like:
file:///Users/tomclose/Documents/Coding/html_forms/basic_form.html?name=tom&email=tom%40example.comthe values that you entered into the form now appear in the url. (The strange %40 is code for the @ character, which isn’t allowed to appear in URLs.)
The following things happened:
- The form packaged up the values you gave it. To do this it used the
nameproperty of each input tag. - It submitted them to the same url you were on.
- It did this by appending them to the url as query parameters.
The important thing in deciding how to package the values was the name property of the <input> tag. The tag
<input name='email'>
was converted to the name-value pair email=tom%40example.com in the URL.
You can get a better idea of these stages by looking at the ‘Network’ tab on Chrome’s developer tools:
- Open Chrome's developer tools and go to the 'Network' tab.
- Put some new values into the form and press 'Submit' again.
- Look at the information in the 'Network' tab.
You should see something like the following: 
There are two GET requests. The first is to the same page, with the field names and their new values as query parameters. The second is to bootstrap - when your browser reloads the page with the new query paramenters, it finds the <link rel='stylesheet' http='bootstrap/css/bootsrap.css' > in the <head> and so fetches that file too.
You can find out more about the first GET request by clicking on the headers tab: 
You should be able to see the names and their values from the input elements.
GET and POST
In the above example we saw that the browser made two GET requests. GET is the most common http verb. It describes the normal way your browser asks for a webpage (and CSS files, js files, images etc.).
The most important thing about GET requests is that they shouldn’t change any values on the server. For this reason they’re not usually used for form submissions, which are generally for providing new data to the server.
We can change the form to submit using a POST request instead.
<form method='post'>
- Change
basic_form.htmlto submit via a post request. - Reload the page, fill in some new values and resubmit the form.
- What happens? Have a look in the 'Network' section of developer tools.
You should notice that this time the URL doesn’t change. When a form is submitted with a POST method the parameters are packaged up and sent along in the headers, instead of being put in the url. You can check this out in Developer tools:
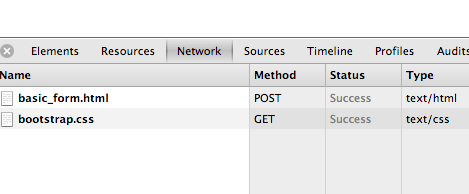
You can see the name and values have been packaged into a payload.

Warning: Just because POST parameters aren’t sent in the URL doesn’t mean they are private. Unless you are using https, anyone watching your traffic can read all the information you’re submitting.
Submitting to a different url
So far all our requests have been to the URL we were on. On the whole, this isn’t too useful. It’s easy to change though:
<form method='post' action='thanks.html'>
By setting the action attribute of the form tag we specify the URL to submit the form to.
- Set the form in
basic_form.htmlto submit tothanks.html. - Refresh and resubmit the form.
- What happens? Where has your data gone?
Google forms trick
In order to have a working form on a website there needs to be somewhere for the information to go when the user clicks submit. So far we have only looked at static webpages: we have a dumb server that just hands out our hand-created HTML and CSS files. We have no way of accepting information from the user.
Later in the course we will build dynamic sites, using Ruby on Rails. In a dynamic site the server builds the pages depending on information stored in a database and details provided by the user. When we have a dynamic site we will just submit the form information back to the server.
In the meantime we will use a trick to submit the data from our form to a Google spreadsheet. We’ll be using our server (GitHub pages) to provide the form, but Google’s servers (for their spreadsheet) to collect the information. We’ll be roughly following the instructions from the morning.am google form post. You might want to read this through first!
Setting up a Google form
To set up a Google form you need a Google drive account. When you have one:
- Log in to Google drive.
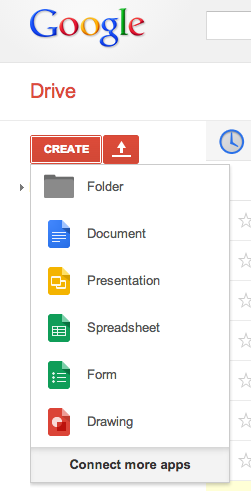
- Create a form.
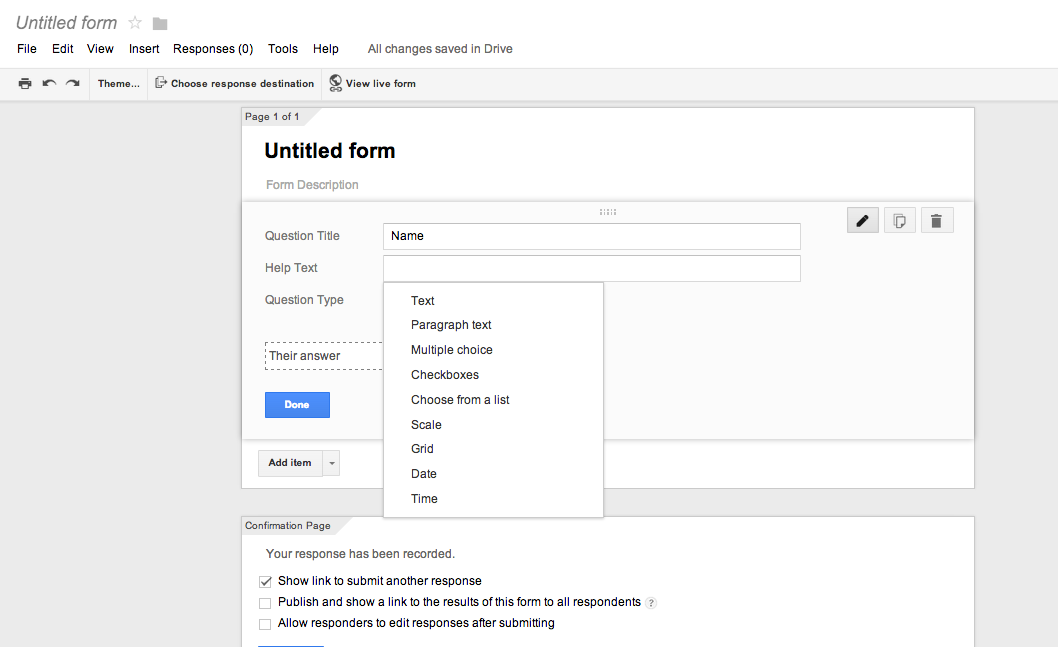
- Add a few text fields (e.g. name, email) to your form.
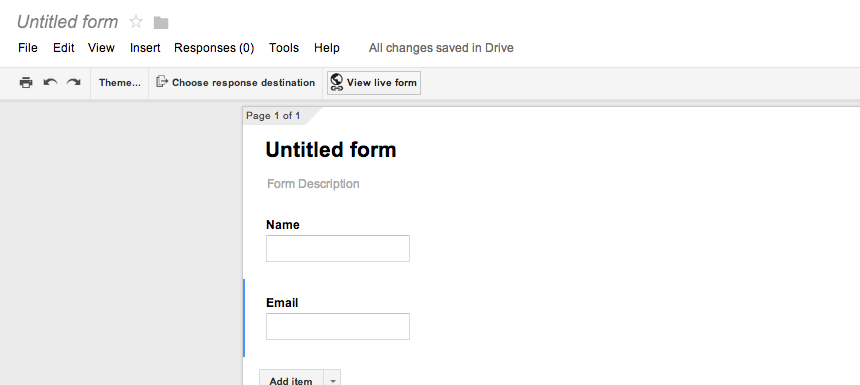
- Go to view the live form.
- Inspect the page source. Find the bit relating to the form.
The bit of source relating to the form should look something like this:
<form action="https://docs.google.com/forms/d/16faBBpyeqEBbHDyhM2K6s0i6UXBckz9vOQGwKrJKyN0/formResponse" method="POST" id="ss-form" target="_self" onsubmit="">
  <ol style="padding-left: 0">
    <div class="ss-form-question errorbox-good">
      <div dir="ltr" class="ss-item  ss-text">
        <div class="ss-form-entry">
          <label class="ss-q-item-label" for="entry_1087713693">
            <div class="ss-q-title">Name</div>
            <div class="ss-q-help ss-secondary-text" dir="ltr">
            </div>
          </label>
          <input type="text" name="entry.1087713693" value="" class="ss-q-short" id="entry_1087713693" dir="auto">
        </div>
      </div>
    </div>
    <div class="ss-form-question errorbox-good">
      <div dir="ltr" class="ss-item  ss-text">
        <div class="ss-form-entry">
          <label class="ss-q-item-label" for="entry_1239878056">
            <div class="ss-q-title">Email
            </div>
            <div class="ss-q-help ss-secondary-text" dir="ltr"></div>
          </label>
          <input type="text" name="entry.1239878056" value="" class="ss-q-short" id="entry_1239878056" dir="auto">
        </div>
      </div>
    </div>
    <input type="hidden" name="draftResponse" value="[]">
    <input type="hidden" name="pageHistory" value="0">
    <div class="ss-item ss-navigate">
      <div class="ss-form-entry" id="navigation-buttons" dir="ltr" style="display: inline-block">
        <input type="submit" name="submit" value="Submit" id="ss-submit">
        <div class="ss-secondary-text">Never submit passwords through Google Forms.</div>
      </div>
    </div>
  </ol>
</form>
Create your own form
You’re now going to take the important bits from the form that Google created and create your own form containing them. The important bits are:
- The form
action. - The form
method(which should be ‘POST’). - The
names (andtypes) from each of the input elements.
If we copy all of these we will end up submitting the same parameters to the same place and our responses will be recorded in the spreadsheet.
Create your own form using the 'important bits' of the Google form.
It should look something like this:
<form action="https://docs.google.com/forms/d/16faBBpyeqEBbHDyhM2K6s0i6UXBckz9vOQGwKrJKyN0/formResponse" method="POST">
  <input type="text" name="entry.1087713693">
  <input type="text" name="entry.1239878056">
  <input type="submit" name="submit" value="Submit">
</form>
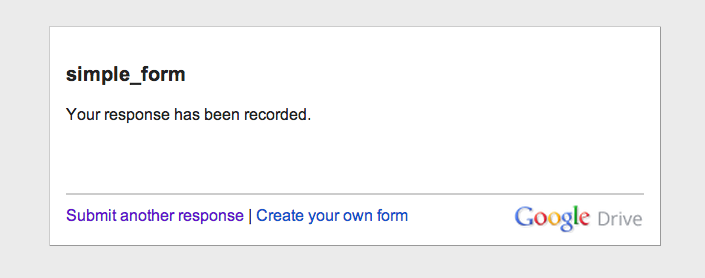
When you submit this form from your browser, you should end up at the Google ‘form submitted’ screen and your response should be in the spreadsheet.
Redirecting the submission
It isn’t ideal that after the submission the user is sent to a Google ‘form submitted’ page. Fortunately it is possible to change this. Again, following the instructions from the morning.am google form post:
Add the required iframe and javascript snippet to redirect your form after submission, from the morning.am google form post.
It should be something like this:
<script type="text/javascript">var submitted=false;</script>
<iframe name="hidden_iframe" id="hidden_iframe" style="display:none;" onload="if(submitted) {window.location='thanks.html';}"></iframe>

<form action="https://docs.google.com/forms/d/16faBBpyeqEBbHDyhM2K6s0i6UXBckz9vOQGwKrJKyN0/formResponse" method="POST" target="hidden_iframe" onsubmit="submitted=true;">
  <input type="text" name="entry.1087713693">
  <input type="text" name="entry.1239878056">
  <input type="submit" name="submit" value="Submit">
</form>
Don’t worry about too much about how this works at this stage. When the user submits the form, they should now be sent to your thanks.html page.
A few things about Google forms
Two things to know about Google forms:
- You need to check that your form is accepting responses. On Form > Responses make sure that ‘Accepting Responses’ is ticked.
- You can set it up to notify you when someone fills in the form. On the spreadsheet for your form go to Tools > Notification Rules.
More form elements
- Open
form_elements.htmlin Sublime Text and in Chrome. - Refer to both as you read through this page.
So far we have only looked at text field elements. As you’re probably aware from experience, there are many other options for html form fields. Here are some of the most common:
Textarea
<textarea name='feedback' rows="3"></textarea>
A textarea is like a text field, except is is expandable.
Password field
<input type='password' name='user_password'>
Password fields obscure your input as you type. They do not encrypt the value that was input - the password will be sent in plain text as a normal name-value pair in the payload. In particular, if you’re using http, anyone snooping on the line can read your password. If you want to be secure you have to use https.
Radio buttons and checkboxes
<!-- radio buttons -->
<input type='radio' name='laptop-type' value='windows'>
<input type='radio' name='laptop-type' value='mac'>
<input type='radio' name='laptop-type' value='linux'>

<!-- checkboxes -->
<input type='checkbox' name='languages-known' value='html'>
<input type='checkbox' name='languages-known' value='css'>
<input type='checkbox' name='languages-known' value='ruby'>
<input type='checkbox' name='languages-known' value='javascript'>
Radio buttons and checkboxes are similar:
- You have multiple options linked by having the same name.
- Each option has a
valuewhich will be used in the name-value pair.
They are different in that:
- In a group of radio buttons only one can be selected.
- In a group of checkboxes you can select zero, one or many.
- If you select multiple checkboxes a name-value pair will be created for each one.
Select boxes
<select name='fruits'>
    <option value='banana'>banana</option>
    <option value='apple'>apple</option>
    <option value='pear'>pear</option>
    <option value='tomato'>tomato</option>
</select>
Select boxes provide a drop-down list of options. Note how the <select> contains the name and each <option> has a different value.
Other options
<input type='color'>
<input type='date'>
<input type='time'>
There are several other options for html input types. For a complete list see here. I don’t know how well supported these ‘other’ types are across browsers - I think they’re probably new in html5. Probably worth testing in multiple browsers (or googling to find out which browsers support them) before you start relying on them!
For more information about styling forms have a look at the Twitter Bootstrap forms section.
Homework
Add a contact form to your personal site
Add a form to collect the email address of people who visit your personal site. It should submit to a google form, which should then send you an email to let you know someone sent you their email address.