Web Fundamentals 4 Collaborative Coding
Getting code from Github
Git recap
Getting code from github
In previous sessions we’ve used git to pull code down from github. We’re going to start this session by doing the same again:
-
Go to the command line and navigate to your
coding_coursefolder -
Clone the project https://github.com/tomclose/cfgmt2013_first_site:
$ git clone https://github.com/tomclose/cfgmt2013_first_site toms_site
You should now see a new file called toms_site in your coding_course folder, and be able to open toms_site/index.html in your browser. The clone operation has copied a local version of the repository onto your computer.
Git will help you keep this local copy updated. If I’ve made some changes and pushed them up to github, you just need to run
$ git pullto pull them down onto your laptop.
-
Open
toms_site/index.htmlin Sublime Text -
Wait for me to make a change and push it to gihub
-
Pull down the changes and make sure you can see them in your browser:
$ git pull
Conflicts
-
Open
toms_site/index.htmlin your code editor, and change the page heading (inside<h1>) to something of your choosing. (At the same time I'll also make a change). When you're done, commit your change to the local repository:$ git add --all $ git commit -m "Changed heading" -
Wait while I push my own change to the
<h1>element. -
Pull down my changes
$ git pull
You should now have a message telling you that you have a merge conflict. This is because our two changes have been made at the same time, so git is unabled to work out which is the up-to-date one to keep. If you look in your file you should see things that look like
<<<<<<< HEAD
    <h1 class="special">My Page</h1>
=======
    <h1 class="special">Tom C's page</h1>
>>>>>>> d76d5a62894057f9c5a4dce0fe5f25110eddd24f
To fix the merge conflict you need to edit this by hand, picking the version you want and then do:
$ git add --all
$ git commit -m "Fixed conflicts"-
Delete the conflict markers (
<<<<,=====,>>>>) fromindex.html(using Sublime text) -
Delete the version of the heading that you don't want.
-
On the command line:
$ git add --all $ git commit -m "Fixed conflicts" -
To have a look at what you've just done:
$ gitk --allor
$ git log --pretty --graph --onelineYou should see how the two versions branched and came back together.
Github collaboration
There are a few options for collaborating with others using Git.
One-way sharing
As we all know, one-way sharing isn’t really sharing at all. Even so, this is the easiest example to look at - in fact we’ve been doing it almost from the first session of the course.
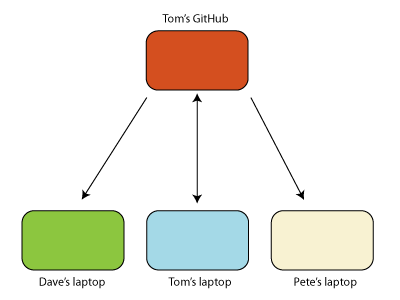
In one-way sharing, there is one ‘master’ repository on GitHub that everyone can read from, but only one person can write to:

Forking
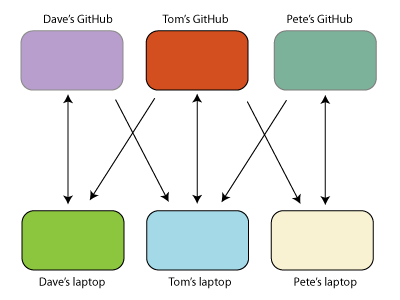
One of the options for sharing your changes with me, is for you to publish your repository too. I can then pull your changes down just as you pulled mine.

Notice that this situation is symmetric - my repositories are equivalent to yours. This makes it a suitable model for many open source projects, where the project maintainer might change over time.
Github makes this model easy by providing a ‘forking’ button. Forking is a quick an easy way make a copy of my repository on GitHub so that you can then pull and push to it.
Sharing
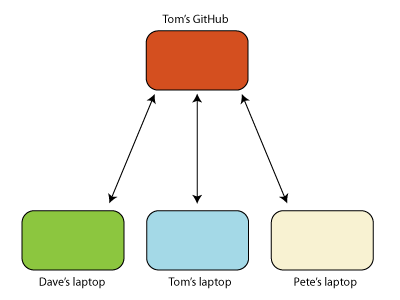
The other way or collaborating with git is the ‘sharing’ model: one person puts the repository on github and gives other people permissions, so you can all push to the same place.

To do this on github, go to your forked landing page repository and click on ‘Settings’ on the right hand side. Then go to ‘Collaborators’ and add your team members’ github usernames.
You can find out more about these different workflow option from the Git book.
Joint project
The purpose of this project is to create a shared html page to serve as a ‘cheat sheet’ for all the different commands you’ve learnt in the course so far (e.g. ls, git add --all etc.). You will need to be in groups of three.
-
Person A should set up a new project on their laptop:
- Create a new folder called
group_cheatsheetin yourcoding_coursefolder - Create a file in that folder called
index.htmlwith some simple html in it.
- Create a new folder called
-
Person A should then set it up as a git repository
$ cd group_cheatsheet $ git init $ git add --all $ git commit -m "Initial import" -
Person A creates a new repo on github. To do this you need to log in at github.com and select "Create a new repo". You should call the repository
group_cheatsheet. -
Person A should then push their code up to github following the instructions on github. You want to "Push an existing repository from the command line" - the instructions at the bottom of the page. You should end up pasting a command like
# Warning: these commands won't work. You need copy the right ones from GitHub. git remote add origin https://github.com/username/blah.git git push -u origin master -
Person A then needs to add everyone else as collaborators by going to
Settings > Collaboratorson the repo page -
Everyone else should then clone the project:
-
Go to the repo's github page
-
Copy the
sshlink from the box on the page -
In your
coding_coursefolder dogit clone paste_the_repo_link_here
-
-
Person B should then download Twitter Bootstrap and put it in the
group_cheatsheetfolder -
Meanwhile Person C should add more content to the page's html
-
Person B should add their changes and push up to github:
git add . git commit -m "Added twitter bootstrap" git push -
Person C should then add their changes and try and push up:
git add . git commit -m "Edits to index.html" git push -
This will probably fail, as C won't have B's changes. To fix this Person C needs to pull and merge (the merge will probably happen automatically if you haven't changed the same files). They should then push again:
git pull # fix any merge conflicts if necessary, then add and commit the changes git push -
Continue to work on the cheatsheet together!
Meet the Command Line
The command line is a way to interact with your computer programmatically. If you are doing any software development you will need to get to grips with using the command line, as many of the programs you will use will be run from the it, instead of by clicking an icon.
Note: when giving you instructions for the command line we will precede them with a $ to represent the command prompt e.g.
$ some_commandYou shouldn’t type the $ sign - just the stuff after it. So for the above instruction you would just type some_command into the command line.
Moving around
The first thing you will need to get used to is moving around. Start by printing the name of the directory you are in:
$ pwdThen have a look at what’s in that directory ( list the contents):
$ lsTo move up a directory ( change directory ) do
$ cd ..To move back into the folder you just left do
$ cd name_of_the_folderYour commandline will help you: tab can often be used to auto-complete names of files, the up arrow can be used to cycle through previous commands that you have typed.
Creating a directory
You can do a lot more on the command line than just move around. We’ll be using the command line a lot over the course. For the time being we just need to create a folder:
$ mkdir coding_courseNote: choosing names without spaces makes command line navigation easier.
-
Open your command line:
- On a Mac open Terminal (Applications > Terminal)
- On Windowns open Command Prompt with Ruby on Rails
-
Find out where you are:
$ pwd -
See what is in the same folder:
$ ls -
If you are on a Mac move into
Documents:$ cd Documents -
Create the folder for the coding course:
$ mkdir coding_course -
Move into that folder:
$ cd coding_course -
Move back up to the folder above
$ cd .. -
Move back into the coding course folder. This time don't type out coding_course - just type out the first few letters and hit
Tab:$ cd coding_course -
In the Finder (Mac) or My Computer (Windows) find the folder that you just created.
Homework
Tell us about your site
Tell us about your first site by filling in this form. If you're still having problems getting it to display online or pointing your url to it, ask in the forum!
Work on your group cheatsheet
Continue to add information to your group cheatsheet. At the very least you should
- Have a section for the basic command line commands.
- Have a section for the basic git commands.
- Have each pushed to the shared repository at least twice by next week.
Learn to hate your track pad
From now on, try to touch your mouse/trackpad as little as often - it will make you quicker and more effective.
- Practise using
Cmd-tab(Mac) orCtrl-tab(Windows) to move between programs. - Practise using
Cmd-space(Mac) or ?? (Windows) to open programs by typing their names. - Practise using short cut keys:
Cmd-s(Mac) orCtrl-s(Windows) for savingCmd-r(Mac) orCtrl-r(Windows) to refresh the browser
Learn to love your editor
Over the rest of the course you will be spending a lot of time in Sublime Text. Investing the time to learn to use it more effectively now will pay off!
(Optional) Take a look through the Sublime text screencasts at Tuts+.